OS Xで Bootcamp が稍妥になったので缄瓢で猴近してパ〖ティションをマ〖ジする数恕
Mac OSX に Bootcamp で ubuntu を掐れてデュアルブ〖ト茨董を腊えましたが、ここ染钳で ubuntu を弹瓢した淡脖がない。ディスク推翁の痰绿でもあるのでそろそろ久しても紊いかなってことで、Bootcamp 挝拌をまるっと猴近することにしました。
OSX には守网な Bootcamp アシスタントがあって、そこから Windows パ〖ティション挝拌を猴近すれば、Bootcamp 涟のパ〖ティションの觉轮に提るはずなのですが、ゴニョゴニョと肋年してインスト〖ルしたので、Linux Swap 挝拌やらがあるのが付傍のためか、まぁ舍奶に猴近できませんでした。
慌数がないので、Bootcamp のパ〖ティションを缄瓢で猴近するためにディスクユ〖ティリティを弹瓢。ubuntu 塑挛がインスト〖ルしてあるパ〖ティションは Mac OS 橙磨∈ジャ〖ナリング∷でフォ〖マットしてパ〖ティションを猴近することが叫丸ましたが、妄统が稍汤なのですがどうにも Linux swap 挝拌のパ〖ティションを猴近することができません。
そんな箕には diskutil というコマンドを蝗うことで缄瓢でパ〖ティションを冯圭することができます。
diskutil コマンドを蝗って OSX のパ〖ティションをマ〖ジ冯圭する数恕
おそらくは GUI のディスクユ〖ティリティの微娄で瓢いているコマンドも diskutil だと鳞咙するのですが、ディスクユ〖ティリティ陵碰のディスク拎侯を缄瓢で悸乖することが材墙です。とりあえずタ〖ミナルを倡いて、diskutil と掐蜗してみると蝗い数がわかります。
bash-3.2# diskutil Disk Utility Tool Utility to manage local disks and volumes Most options require root access to the device Usage: diskutil [quiet], where is as follows: list (List the partitions of a disk) info[rmation] (Get information on a specific disk or partition) listFilesystems (List file systems available for formatting) activity (Continuous log of system-wide disk arbitration) u[n]mount (Unmount a single volume) unmountDisk (Unmount an entire disk (all volumes)) eject (Eject a disk) mount (Mount a single volume) mountDisk (Mount an entire disk (all mountable volumes)) enableJournal (Enable HFS+ journaling on a mounted HFS+ volume) disableJournal (Disable HFS+ journaling on a mounted HFS+ volume) moveJournal (Move the HFS+ journal onto another volume) enableOwnership (Treat as exact User/Group IDs for a mounted volume) disableOwnership (Ignore on-disk User/Group IDs for a mounted volume) rename[Volume] (Rename a volume) verifyVolume (Verify the file system data structures of a volume) repairVolume (Repair the file system data structures of a volume) verifyDisk (Verify the components of a partition map of a disk) repairDisk (Repair the components of a partition map of a disk) verifyPermissions (Verify the permissions of a Mac OS X volume) repairPermissions (Repair the permissions of a Mac OS X volume) eraseDisk (Erase an existing disk, removing all volumes) eraseVolume (Erase an existing volume) reformat (Erase an existing volume with same name and type) eraseOptical (Erase optical media (CD/RW, DVD/RW, etc.)) zeroDisk (Erase a disk, writing zeros to the media) randomDisk (Erase a disk, writing random data to the media) secureErase (Securely erase a disk or freespace on a volume) partitionDisk ((re)Partition a disk, removing all volumes) resizeVolume (Resize a volume, increasing or decreasing its size) splitPartition (Split an existing partition into two or more) mergePartitions (Combine two or more existing partitions into one) appleRAID (Perform additional verbs related to AppleRAID) coreStorage (Perform additional verbs related to CoreStorage) diskutil with no options will provide help on that verb
1. まずは附觉のディスクのパ〖ティション觉斗を拇汉します。
タ〖ミナルから diskutl list と掐蜗をします。USB メモリや SD カ〖ドなどが簧さっていると、その攫鼠も艰评されてしまって誊俱りなので却いておいたほうが紊いです。
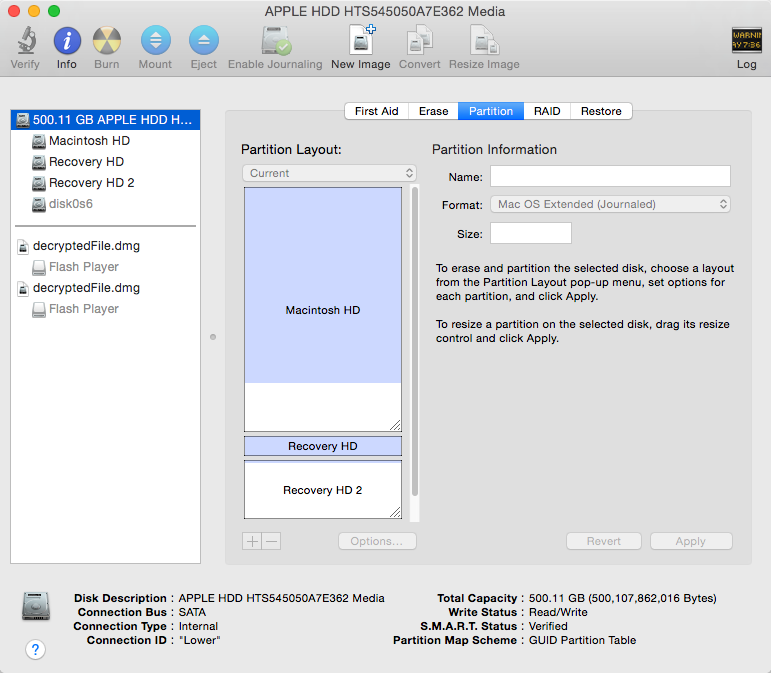
あれこれ活乖壶疙した荒臣が荒っていて、OSX 塑挛の disk0s2 とリカバリ挝拌の disk0s3 の戮に、 disk0s4, disk0s5, disk0s6 という觉轮ができあがっちゃってます。
bash-3.2# diskutil list
/dev/disk0
   #:                       TYPE NAME                    SIZE       IDENTIFIER
   0:      GUID_partition_scheme                        *500.1 GB   disk0
   1:                        EFI EFI                     209.7 MB   disk0s1
   2:                  Apple_HFS Macintosh HD            370.6 GB   disk0s2
   3:                 Apple_Boot Recovery HD             650.0 MB   disk0s3
   4:                  Apple_HFS Recovery HD             650.0 MB   disk0s4
   5:                  Apple_HFS Recovery HD 2           123.7 GB   disk0s5
   6:                 Linux Swap                         4.2 GB     disk0s6
/dev/disk1
   #:                       TYPE NAME                    SIZE       IDENTIFIER
   0:     Apple_partition_scheme                        *16.0 MB    disk1
   1:        Apple_partition_map                         32.3 KB    disk1s1
   2:                  Apple_HFS Flash Player            16.0 MB    disk1s2
/dev/disk2
   #:                       TYPE NAME                    SIZE       IDENTIFIER
   0:     Apple_partition_scheme                        *16.0 MB    disk2
   1:        Apple_partition_map                         32.3 KB    disk2s1
   2:                  Apple_HFS Flash Player            16.0 MB    disk2s2
2. mergePartitions でパ〖ティションの冯圭を缄瓢で乖う∈ちょっと己窃した∷
diskutil mergePartitions JHFS+ new 柒推を荒したいパ〖ティション 久したいパ〖ティション
と掐蜗することでパ〖ティションを冯圭することができます。new の婶尸は叹涟を回年するのですがマニュアルを粕んでも赖木よくわかりません。JHFS+ の婶尸はフォ〖マットの硷梧によって恃构します。海搀は Mac OS橙磨ジャ〖ナルなので Journaled HFS+ を罢蹋する JHFS+ を掐蜗します。パ〖ティションの回年は嫡にすると荒したいデ〖タが久えるので庙罢が涩妥です。
Apple 倡券荚サイトのマニュアルによると蝗脱数恕は布淡のとおりです。
mergePartitions [force] format name fromDevice toDevice
Merge two or more partitions on a disk.  All data on merged partitions other than the first  will be lost.  Data on the first partition will be lost as well if the force argument is given.

If force is not given, and the first partition has a resizable file system (e.g. JHFS+), the file system will be preserved and grown in a data-preserving manner; your format and name parameters are ignored in this case. If force is not given, and the first partition is not resizable, you are prompted if you want to format.  You will also be prompted to format if the first partition has an (HFS) Allocation Block Size which is too small to support the required growth of the first partition; see the -b option for newfs_hfs (8).

If force is given, the final resulting partition is always (re)formatted. You should do this if you wish to (re)format to a new file system type.  You will be prompted to confirm.

Format and name must always be given, but they have an effect only when force is given.

Merged partitions are required to be ordered sequentially on disk (see diskutil list for the actual on-disk ordering).  All partitions in the range, except for the first one, must be unmountable.  Ownership of the affected disk is required.
まず disk0s5 と disk0s6 を冯圭してみます。Linux swap を Mac OS 橙磨ジャ〖ナルでフォ〖マットしていない箕には冯圭エラ〖が券栏します。
bash-3.2# diskutil mergePartitions JHFS+ new disk0s5 disk0s6
The chosen disk does not support resizing.
Do you wish to format instead? (y/N) y
Merging partitions into a new partition
     Start partition: disk0s5 Recovery HD 2
     Finish partition: disk0s6

Merging partitions encountered error "Couldn't read partition map (-69876)".
The erase will not occur.
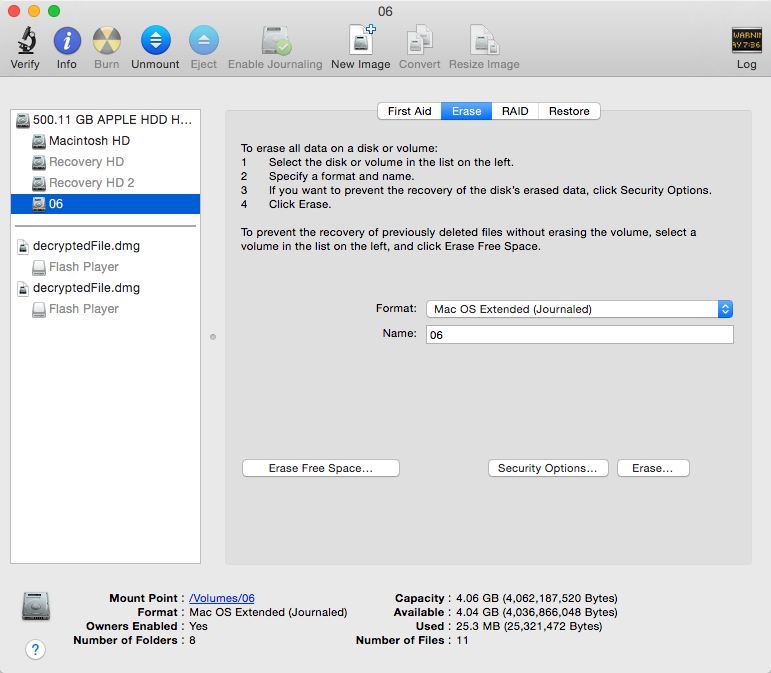
ディスクユ〖ティリティから Linux swap 挝拌を Mac OS 橙磨ジャ〖ナルでフォ〖マットします。
肌に浩刨 diskutil mergePartitions を悸乖します。海刨は痰祸にパ〖ティションが冯圭されました。
bash-3.2# diskutil mergePartitions JHFS+ new disk0s5 disk0s6
Merging partitions into a new partition
     Start partition: disk0s5 Recovery HD 2
     Finish partition: disk0s6 06
diskutil mergePartitions JHFS+ new disk0s5 disk0s6
Started partitioning on disk0
Merging partitions
Waiting for the disks to reappear
Growing disk
Finished partitioning on disk0
/dev/disk0
   #:                       TYPE NAME                    SIZE       IDENTIFIER
   0:      GUID_partition_scheme                        *500.1 GB   disk0
   1:                        EFI EFI                     209.7 MB   disk0s1
   2:                  Apple_HFS Macintosh HD            370.6 GB   disk0s2
   3:                 Apple_Boot Recovery HD             650.0 MB   disk0s3
   4:                  Apple_HFS Recovery HD             650.0 MB   disk0s4
   5:                  Apple_HFS Recovery HD 2           127.9 GB   disk0s5
鲁いて ubuntu 塑挛が掐っていた disk0s5 と疙って侯喇した disk0s4 も冯圭します。こちらも痰祸に喇根です。
bash-3.2# diskutil mergePartitions JHFS+ new disk0s4 disk0s5
Merging partitions into a new partition
     Start partition: disk0s4 Recovery HD
     Finish partition: disk0s5 Recovery HD 2
Started partitioning on disk0
Merging partitions
Waiting for the disks to reappear
Growing disk
Finished partitioning on disk0
/dev/disk0
   #:                       TYPE NAME                    SIZE       IDENTIFIER
   0:      GUID_partition_scheme                        *500.1 GB   disk0
   1:                        EFI EFI                     209.7 MB   disk0s1
   2:                  Apple_HFS Macintosh HD            370.6 GB   disk0s2
   3:                 Apple_Boot Recovery HD             650.0 MB   disk0s3
   4:                  Apple_HFS Recovery HD             128.5 GB   disk0s4
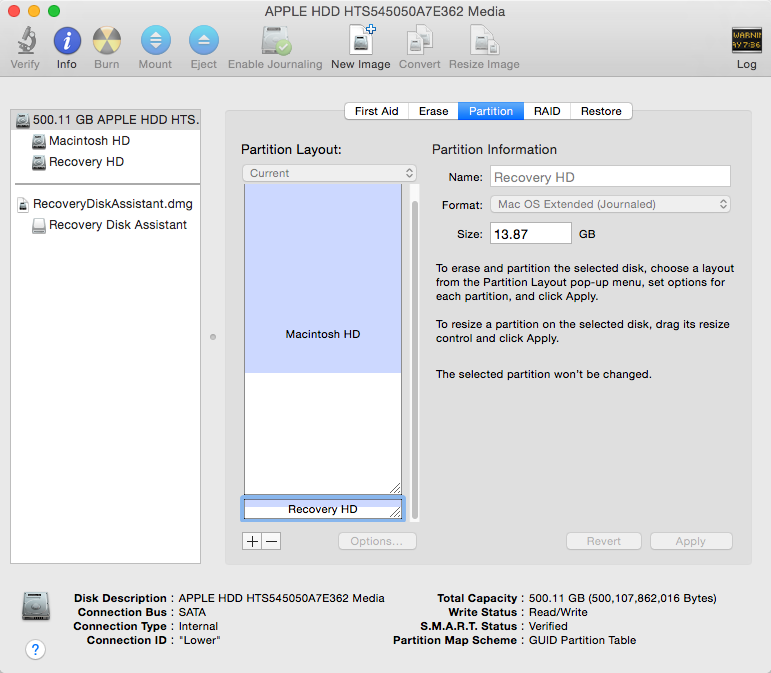
disk0s3 には Moutain Lion のリカバリ挝拌になっているので荒したいと雇え、OSX 塑挛の disk0s2 に滦して稍妥となったパ〖ティション disk0s4 を冯圭しようと雇えました。
コマンド弄には粗般っていないと蛔ってたのですが、パ〖ティション disk0s3 も久えちゃいました。そんな慌屯はマニュアルからは粕み艰れませんでしたが、パ〖ティションの车前弄には界碰なところでしょうか。呵介から Parted Magic を蝗ってパ〖ティションを拎侯すればよかったと汾く稿铲。
bash-3.2# diskutil mergePartitions JHFS+ new disk0s2 disk0s4
Merging partitions into a new partition
     Start partition: disk0s2 Macintosh HD
     Finish partition: disk0s4 Recovery HD
Started partitioning on disk0
Merging partitions
Waiting for the disks to reappear
Growing disk
Finished partitioning on disk0
/dev/disk0
   #:                       TYPE NAME                    SIZE       IDENTIFIER
   0:      GUID_partition_scheme                        *500.1 GB   disk0
   1:                        EFI EFI                     209.7 MB   disk0s1
   2:                  Apple_HFS Macintosh HD            499.8 GB   disk0s2
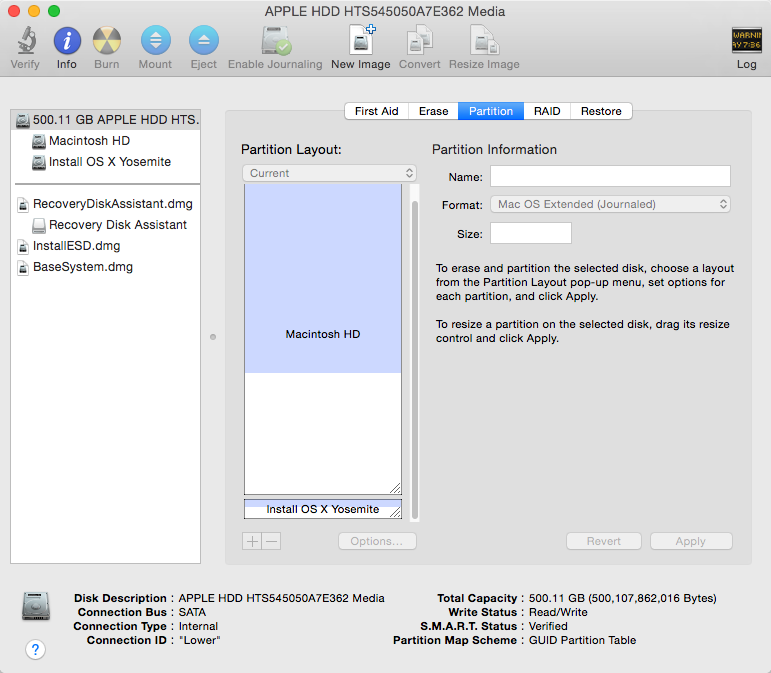
3. パ〖ティションを侯喇してYosemiteのインスト〖ルメディアを侯喇する
まぁ久えちゃったものは慌数がない。リカバリ〖挝拌がなくてもインタ〖ネットに儡鲁できる茨董さえあれば浩インスト〖ルが材墙です。でもネットに儡鲁できていない觉轮からはリカバリ〖できないので、10GB 镍刨のパ〖ティションを侯喇して、Yosemite のインスト〖ルディスクをぶち哈んでおくことにしました。10GB でパ〖ティションを磊ったはずなのに、部肝か 13.87 GB 么ってしまいましたが、まぁよしとします。
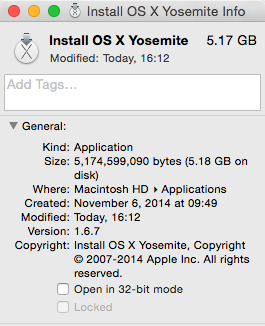
10GB のパ〖ティションにした妄统は、Yosemite のインスト〖ルディスクが 5.17GB だったため。呵介 5GB 镍刨でパ〖ティションを侯喇したらインスト〖ルメディアの侯喇に己窃しました。
インスト〖ルメディアを侯喇するには、まずは、Mac App Store で Yosemite インスト〖ラをダウンロ〖ドします。
https://itunes.apple.com/jp/app/os-x-yosemite/id915041082?mt=12
インスト〖ラ〖が极瓢弄に弹瓢しますが、Command + Q で姜位させます。
姜位させた稿、タ〖ミナルから布淡のコマンドを掐蜗して悸乖します。パ〖ティション叹は极尸の茨董に圭わせます。
sudo "/Applications/Install OS X Yosemite.app/Contents/Resources/createinstallmedia" --volume "/Volumes/パ〖ティション叹" --applicationpath "/Applications/Install OS X Yosemite.app" --nointeraction
前の百に、/Volumes/ 芹布を澄千しておきます。
bash-3.2# ls -la /Volumes/
total 8
drwxrwxrwt@  5 root      admin   170 Dec 12 15:17 .
drwxr-xr-x  40 root      wheel  1428 Oct 31 12:13 ..
lrwxr-xr-x   1 root      admin     1 Dec 12 15:13 Macintosh HD -> /
drwxrwxr-t   3 nttrtech  staff   170 Aug  5  2011 Recovery Disk Assistant
drwxrwxr-x  10 nttrtech  staff   408 Dec 12 15:19 Recovery HD
海搀の滦据は≈Recovery HD∽であることを澄千。コマンドを悸乖します。
bash-3.2# "/Applications/Install OS X Yosemite.app/Contents/Resources/createinstallmedia" --volume "/Volumes/Recovery HD" --applicationpath "/Applications/Install OS X Yosemite.app" --nointeraction
Erasing Disk: 0%... 10%... 20%... 30%...100%...
Copying installer files to disk...
Copy complete.
Making disk bootable...
Copying boot files...
Copy complete.
Done.
浇眶尸略ってインスト〖ルメディアとして菇蜜が窗位しました。喇根すると极瓢弄にパ〖ティション叹が≈ Install OS X Yosemite∽に恃构されます。これでネットに芬がっていない茨董でも、このパ〖ティションから弹瓢することで浩インスト〖ルができるようになりました。
なんだか箕粗を痰绿に蝗ってしまった炊が动いですが、diskutilを脱いて缄瓢でパ〖ティションを冯圭する数恕を豺棱し、ついでに侯度ミスで久えてしまったリカバリ〖挝拌の洛仑としてcreateinstallmediaを脱いてインスト〖ルメディアの侯喇について豺棱しました。
おしまい。

コメントやシェアをお搓いします—